How to make your remote workshop a success
How to make your remote workshop a success
Everything you need to know to succeed with your digital, remote, virtual or whatever you want to call your workshop
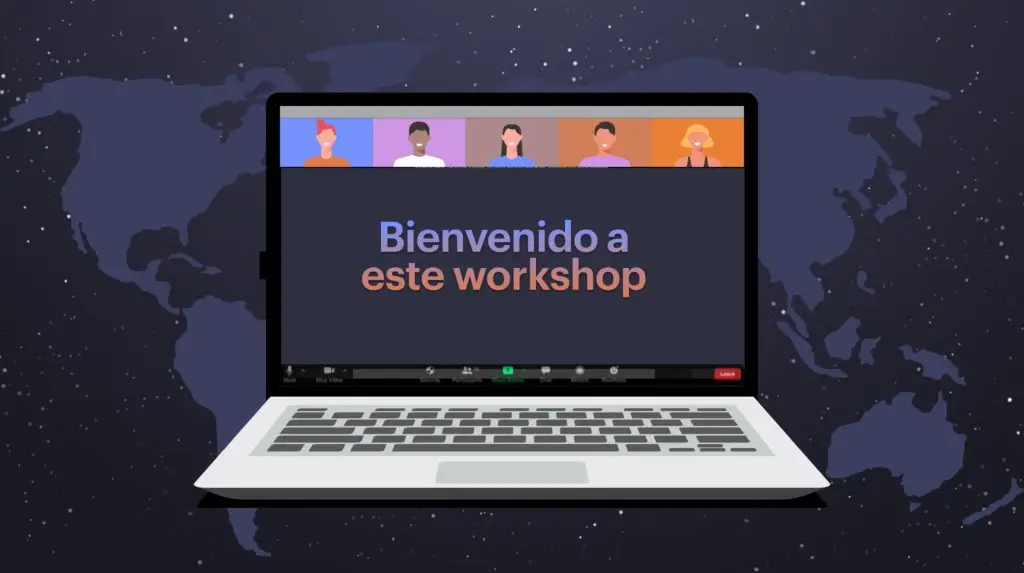
The big mistake of a remote workshop is trying to replicate a physical one in front of a screen and the key is to humanise the virtual workshop (which is what it lacks compared to the physical one) and in this article I am going to give you the tips to achieve it.
Are they the same? No, remote workshops are less expensive, less human and although they don’t give exactly the same result…remember that they are cheaper.
Let me give you an example, in my case, during this pandemic year I have facilitated 35 workshops; all of them remote, with an average cost of less than 100€ (in licenses, everything). The previous year, 10 in physical format (average cost €1,500: room, catering, posits, posters, travel…). So… as they are cheaper and they work… they are one of the things that have come to stay.
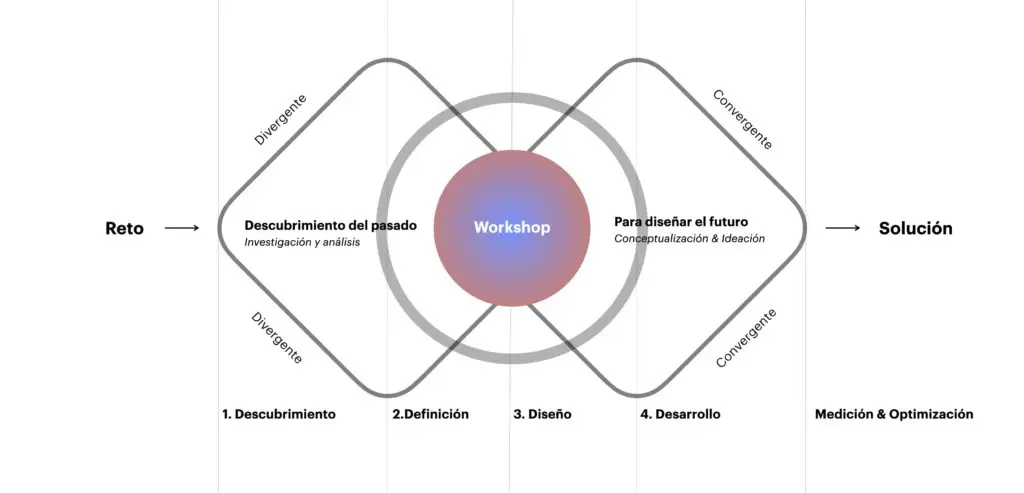
The Design Thinking process
The workshop usually takes place in the ideation phase of the Design Thinking process. Most commonly they are used for the co-creation of new solutions. Although a workshop can also be used to validate the design or for whatever is needed, (the workshop is a means to achieve something and not an end in itself, I will repeat this a lot, but I want to make it very clear).
The Framework
I have divided the tasks in 3 phases:
- Pre: which is where the most work needs to be done.
- During: the important thing is to create a relaxed atmosphere and achieve quality conversations.
- Post: which includes the icing on the cake: the thank you.
The idea is that this tasty cake will serve you as a cheat sheet when you are preparing the workshop (I have called it framework because calling it a cheat sheet… is a bit unprofessional).

1. PRE
1.1. Goal
The first thing to do is to establish the goal of the Workshop. Remember what has already been said: Workshops are a means to achieve something, not an end in itself. There are many dynamics that can be used in Workshops, so it is important that you ask yourself what you want to get out of the Workshop.
Why do I do this workshop? To get some screen designs, a new experience, the process design, innovative initiatives, a strategic plan… I have even done workshops to design a collaboration agreement between two companies. Doing a workshop is a collaborative way to address a problem. So determine the «what for» of the workshop and always keep it in mind.
1.2. Duration
Then you have to analyse how long the Workshop will last and on what date you are going to do it in order to send the Save The Date as soon as possible
I do not recommend a more than 3 hour session. Don’t forget to include breaks of at least 10 minutes every hour and a half of the session. I recommend short breaks so that people can check their e-mail, take a bathroom break, have a snack…
As soon as you know when it’s going to be and who will attend, send out the Save the Date so that people have that slot blocked and you can make sure they attend.

When there are different countries involved, with different time zones, you have to analyse the time zones, when they eat, when they finish their working day to see what time will be more convenient for all of them.
1.3. Participants
If you are conducting the workshop for a client, ask them to select the participants, remind them of the importance that the person chosen must be creative, constructive and contribute with new ideas.
If you are designing a tool, a process or a plan, ask the people who are going to be directly impacted to participate (the grunt and not the managers who, generally, are not users of the tool).
Don’t worry, it is normal to change the people you missed from the initial list.
Limit participants to 10 people per workshop.
It is very useful to have an Excel spreadsheet with the information related to the participants, call it stakeholder map (and keep it well, this will be your Holy Grail).

Write down all the information you have about the participants and it will help you to find topics of conversation in the workshop, or simply to get them to like you better.
1.4. Tools
How are you going to do it? Analyse which tools you are going to use and manage licences.
Analyse the pros and cons of each tool, from videoconferencing to the digital dashboard to surveys (if you want to launch one).
Select very carefully which ones you are going to use and remember that too many tools can overwhelm the user, so less is more.
For example, if you are going to use Zoom, which has the functionality to launch surveys you will no longer need Mentimeter.
I recommend:
- Teams or Zoom video conferencing (the good thing about Zoom is that it drags the cameras, which gives you more of a sense of being all together, it has simultaneous translation… but it’s not usually approved by clients, for security reasons) or Google meet.
- Digital dashboard: Mural or Miro.
- On-the-fly surveys (synchronous): Mentimeter, Kahoot.
- Surveys to do later (asynchronous): Typeform or Google Forms.
These are the typical tools, but if you really want to be innovative I recommend you to do some research (search on the Internet) and try them before the Workshop.
(For example, as I try to read the news every day, I also visit websites like Product Hunt to see if there is an app/digital tool that will help me to do my job better).
1.5. Theme
Choose a theme to make everything easier for you (as this will make it easier to gamify) and… take care of it. Get right down to work, make a logo, choose a colour palette… don’t do something halfway, either you go all the way in or you don’t try to do it at all because it might look bad (remember that it’s not time wasted, you can always reuse the material and improve it).
Popular themes are: football, food, space (this is the one I use often as most of the workshops I do are related to digital transformation, strategic plans or defining the North Star). But the more it is adapted to your context and participants, the more engagement it will generate.
For example, in a project for Spain’s top energy company, we found out in the interviews conducted in the Discovery phase that there were a lot of Star Wars fans. So we did the workshop based on the saga: colours, typography, video montages, even the names of each activity! It was super geeky, but a total success.
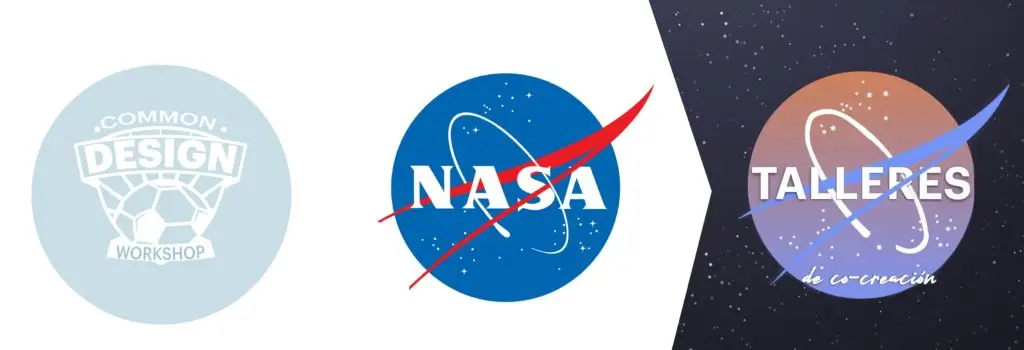
Logo for a football-themed workshop and logo for a space-themed workshop (which as you can see is inspired by the Nasa logo).

If your workshop is set in space, use a spaceship Teams background.

«Yoda’s Learnings»
Copy of the exercise adapted to a Star Wars theme.
1.6. Prepare the exercises
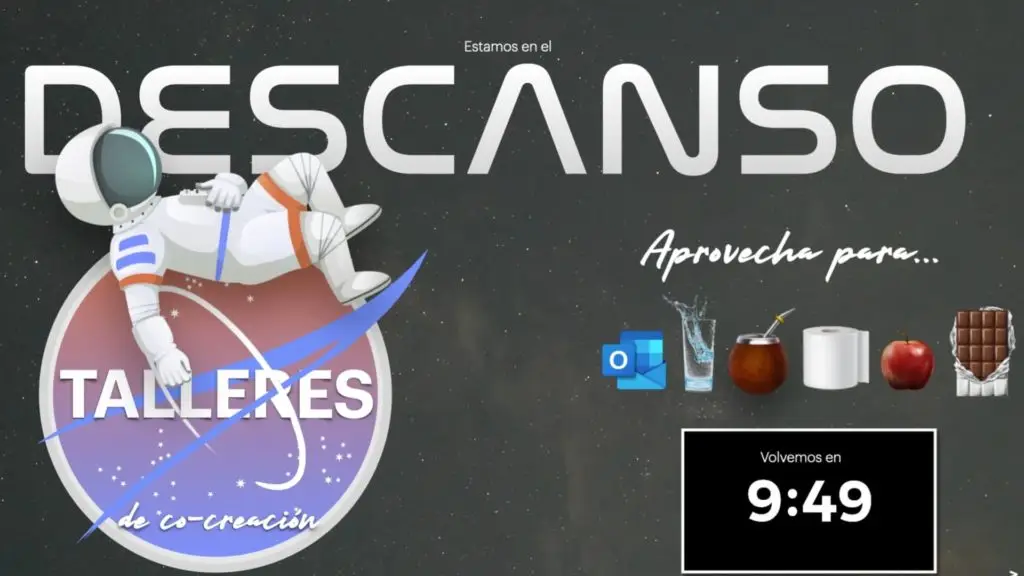
Not only the exercises that will be done during the workshop, you also have to prepare the asynchronous tasks on the Mural/Miro (for when they register), the training you will do (if necessary), the reception cover, the board or mural for the day of the workshop and the interstitials or transition screens between activities.

Example of the reception cover. Videos always look better than a static slide. There are sites like pexels where you can get them.
Avoid silences, use interstitials -better if they are with video- so that the screen never goes blank. During the workshop, the participant must perceive that something is happening at all times. This way you increase engagement, if someone joins late they will know where they are and if they were already participating, when they see the movement they won’t think that they have lost connection or that the image has «frozen».
Illustrative example of what the rundown could contain
With regard to the exercises, the best thing to do is to do a rundown and once you know which ones you are going to do, start designing the board or mural on which they are going to work.
I recommend that you design a template in a design program such as Figma (which is free) and then export the template and reduce the size with a program like squoosh. This avoids adding unnecessary weight to the mural and makes it more responsive. The first time, I added so many individual visual elements to my mural and uploaded them one by one, and it overloaded. But the important thing is that I learned my lesson and this trick I told you about (design and reduce the size in a program) works.

Illustrative example of what the rundown could contain

I suggest making a Wireframe first so that it has logic and the mural itself is intuitive. And then give them the look & feel of the theme.
1.7. Accessing the tools
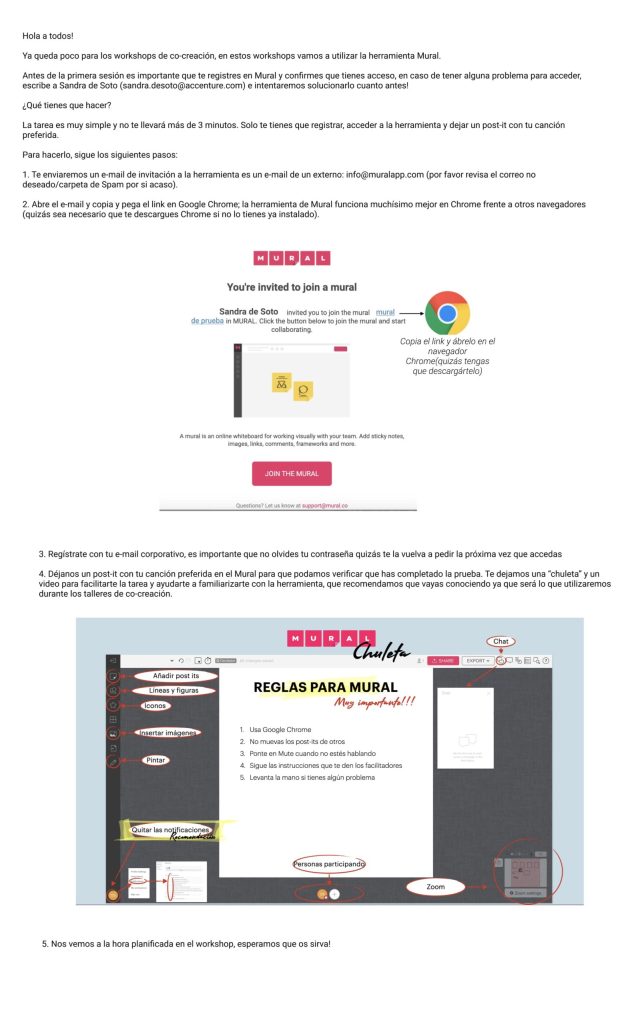
I usually send an e-mail like this one, with a link to a video tutorial of a mural and I attach the Participant’s Guide.
Prepare an e-mail where you give context about the workshop and let them know that they are going to use the Mural or Miro tool. Ask them to do an exercise (this way you make sure that they register prior to the day of the workshop and that they do not have any access problems, firewalls blocking access, etc.).
In this e-mail attach the Participant’s Guide.
I usually ask them to leave me a song and then I click on the person who has left the post, I write down the song on the Stakeholder Map, I make a list on Spotify and we listen to it during the workshop. This way you make sure that at least one of them likes the music that is playing! And you contribute to create a more relaxed atmosphere where creativity will flow better.
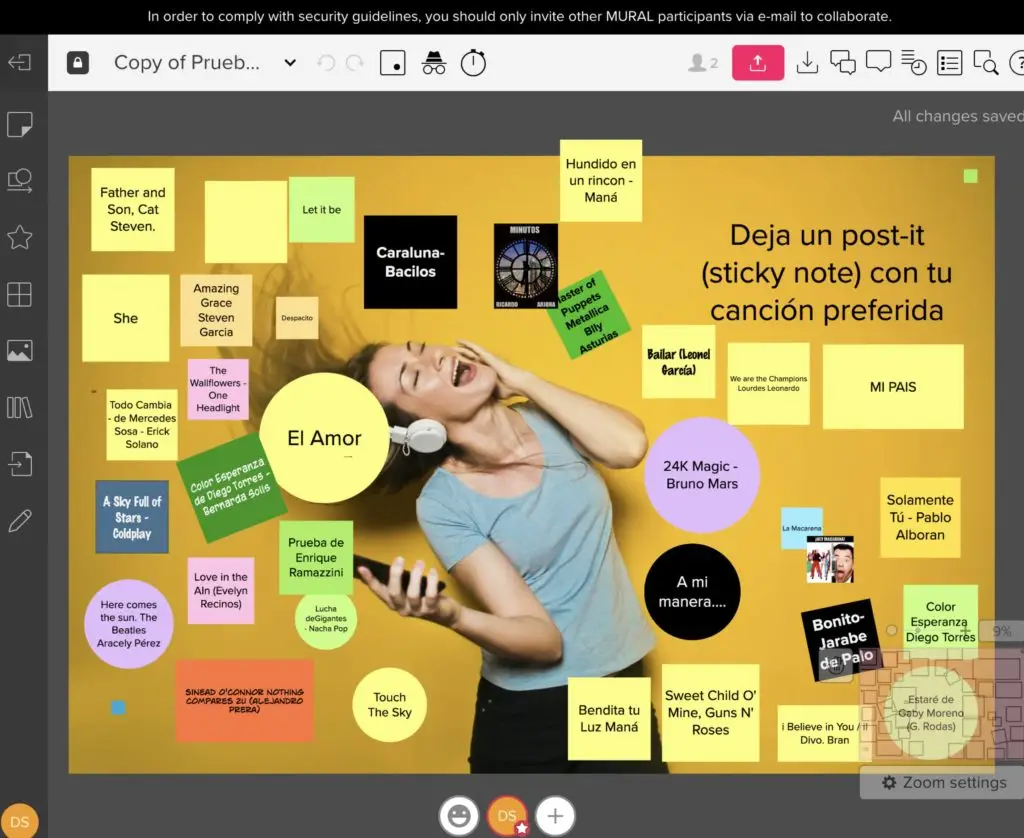
Mural test, in this case we asked them for a song that we then played during the Workshop
1.8. Project infographic
To make sure that everyone understands the context of the Workshop you can make an infographic that you will paste in the body of the e-mail so that it is perfectly visible.
The client wanted to send the participants a Word document and we thought it was more visual to make an infographic and paste it in the body of the e-mail (not as an attachment) to make sure they at least saw it and read it, as it is easier than opening an attachment.
1.9. Participant’s Guide
The Participant’s Guide is a document that will be sent before the workshop and will answer the main questions that the participant may have.
It will be set according to the theme chosen for the Workshop.
To make sure that I am transmitting the message effectively, I usually use the 5W+H:
- What
- Why
- When
- Where
- Who
- (How)
It is essential to explain the goal of the workshop, what is expected of them, if there are more people, explain what role each one plays, explain what digital tools they are going to use, the session’s baseline, if they have any problems who they should call (helpdesk), include who is going to participate, especially if they don’t know each other, how they have to behave…
In a workshop with more than 150 participants from different countries and who don’t know each other, for example, they all were together in the Ice-breakers, we made an avatar for each of them and included it at the end of the guide in a section called “Who is who”.
It is advisable to organise a pre-Workshop session where the Guide is presented to make sure that everyone starts from the same baseline and readiness.

Illustrative examples of things that the guide can include.
1.10. Training
Before the workshop you should do a training session for those who have never used the Mural tool.
Give them a tour of the functionalities and then set them simple tasks. The goal is to have them use as many of the features as possible.
The unique facts they fill in, write them down on the Stakeholder Map, so that on the day of the workshop you can bring up topics of conversation and empathise more with them.

The most important thing is that they play with the tool as much as possible.
2. DURING
2.1. Manifesto
Before starting the workshop, remind them why they are there and what is expected of them. Emphasise the importance of their participation and acknowledge their role (I usually mention to them that they have been selected from all of the employees in the organisation, this makes them want to live up to it and makes them work harder).
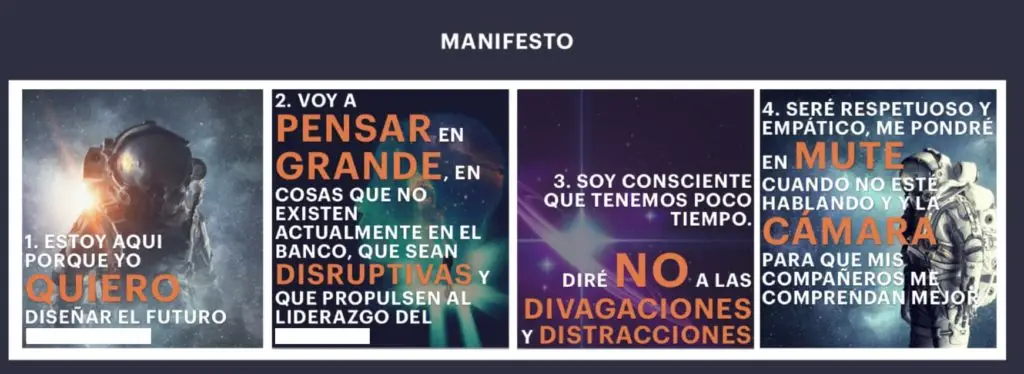
To emphasise this, I usually put it on top of the Mural they are going to work on and read it out loud before starting the ice-breaker.
2.2. Ice-breaker
The aim of the Ice-breaker dynamic is to create a relaxed atmosphere, where they feel at ease, so that their creativity can flow.
On the internet there are many websites with a multitude of Ice-breaker exercises, but these are my TOP ones:
- Optical illusions: this activity can be done on a mural, to launch a presentation and have them vote in Teams or to launch it with a Mentimeter. It serves to practice concentration (the images are taken from Pinterest). Listed below, are the dynamics to be followed:
The first one is of Angelina Jolie with her mouth upside down and the question is: is she beautiful? When the majority have answered yes, you turn the image around and show them that her mouth is upside down (and no, she is not beautiful at all). They laugh and move on to the next one.
Which is bigger, the central circle of A or B? Now they will be more interested, so they tend to take it more seriously, in this case the answer is that both are the same.
- And finally, who do you see Marilyn Monroe or Einstein? From close up you see Einstein, from far away you see Marilyn. This exercise forces them to get up from their chair to see the character.
- Flashback: Flashback is an exercise I made up for a Workshop and consists of projecting a photo of one of the participants when they were little, so that the rest of the participants can guess who it is. You have to ask for the photo before the workshop. You can do it in a presentation and launch the survey in Zoom or in Mentimeter. I love this Ice-breaker because it moves people and brings a touch of tenderness and humanity.
- Dancing: with this exercise you force people to get up, stretch, exercise and laugh. In a workshop for a Spanish bank with international presence, with participants from many countries, we hired Aurora Muñoz, teacher and Influencer, who gave us a 7-minute flamenco class entitled «How to look like you know how to dance when you have no idea; basic tips». People put on the camera, stretched (at least their arms), we laughed and learned something new. The foreigners loved it.
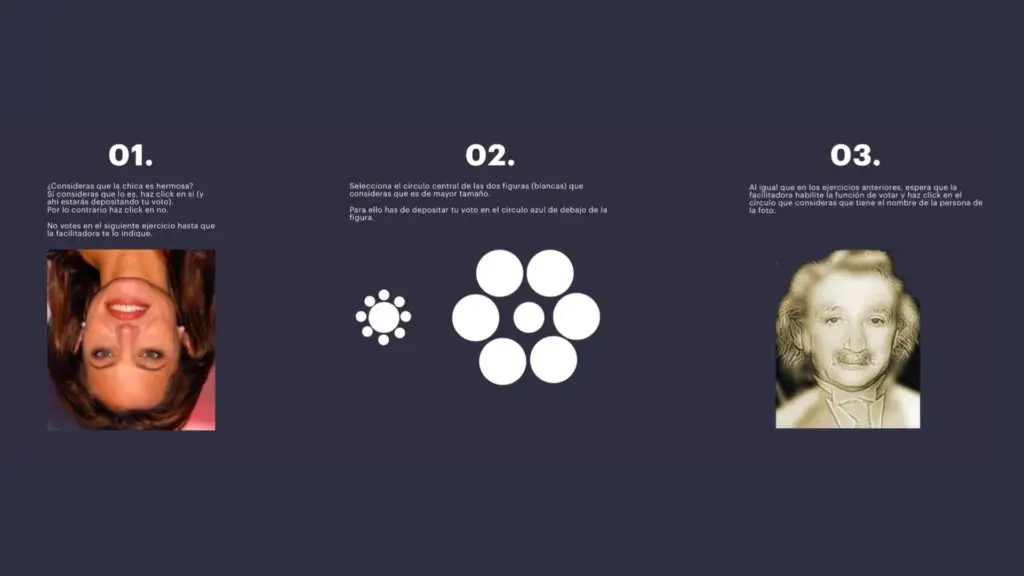
Optical Illusions
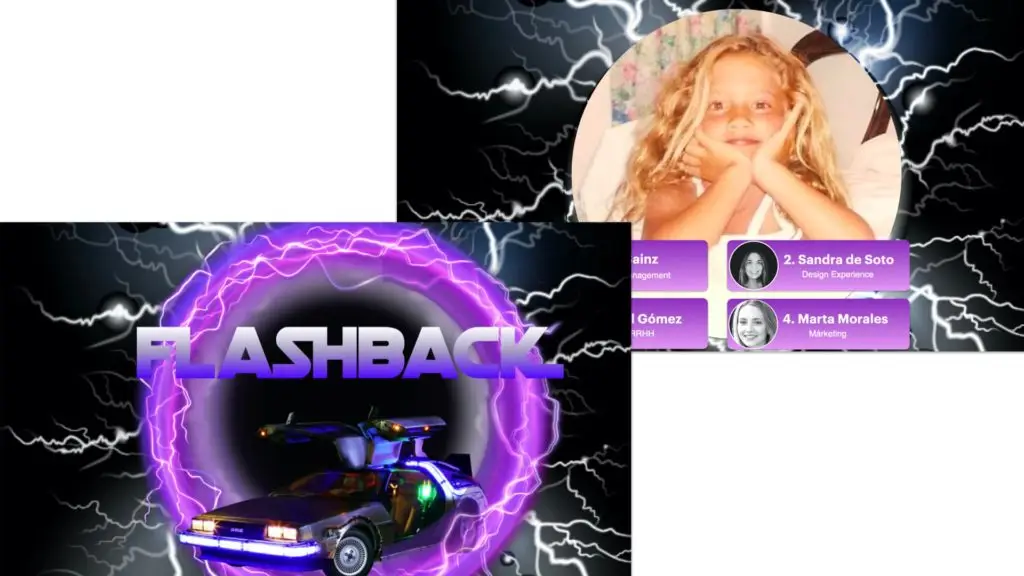
Flashback
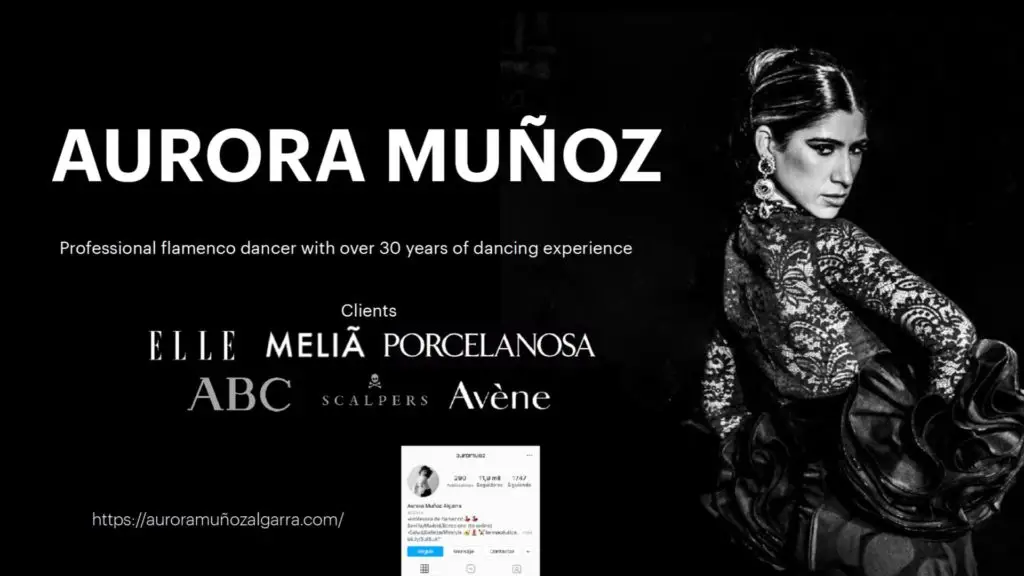
Mini flamenco class: «How to look like you know how to dance when you have no idea; basic tips».
2.2. Ice-breaker
The aim of the Ice-breaker dynamic is to create a relaxed atmosphere, where they feel at ease, so that their creativity can flow.
On the internet there are many websites with a multitude of Ice-breaker exercises, but these are my TOP ones:
- Optical illusions: this activity can be done on a mural, to launch a presentation and have them vote in Teams or to launch it with a Mentimeter. It serves to practice concentration (the images are taken from Pinterest). Listed below, are the dynamics to be followed:
The first one is of Angelina Jolie with her mouth upside down and the question is: is she beautiful? When the majority have answered yes, you turn the image around and show them that her mouth is upside down (and no, she is not beautiful at all). They laugh and move on to the next one.
Which is bigger, the central circle of A or B? Now they will be more interested, so they tend to take it more seriously, in this case the answer is that both are the same.
- And finally, who do you see Marilyn Monroe or Einstein? From close up you see Einstein, from far away you see Marilyn. This exercise forces them to get up from their chair to see the character.
Optical Illusions
- Flashback: Flashback is an exercise I made up for a Workshop and consists of projecting a photo of one of the participants when they were little, so that the rest of the participants can guess who it is. You have to ask for the photo before the workshop. You can do it in a presentation and launch the survey in Zoom or in Mentimeter. I love this Ice-breaker because it moves people and brings a touch of tenderness and humanity.
Flashback
- Dancing: with this exercise you force people to get up, stretch, exercise and laugh. In a workshop for a Spanish bank with international presence, with participants from many countries, we hired Aurora Muñoz, teacher and Influencer, who gave us a 7-minute flamenco class entitled «How to look like you know how to dance when you have no idea; basic tips». People put on the camera, stretched (at least their arms), we laughed and learned something new. The foreigners loved it.
Mini flamenco class: «How to look like you know how to dance when you have no idea; basic tips».
2.3. Design Thinking exercises
The facilitator has to enable/facilitate quality conversations and not co-create together with the participants.
Our aim, as facilitators, is to create a relaxed atmosphere where they feel at ease and where creativity flows. The ideas have to come from the participants, so ask them questions, challenge them, question them, but never, never propose them… Imagine that it works badly or whatever «it was XX/your company) that told us to set up a chat», for example.
When they are doing thinking exercises, to avoid uncomfortable silences, what I usually do is to play them a playlist that I have prepared in advance. Generally with the songs they left when they signed up for the Mural.
I have written these songs down in the Stakeholder Map for each one because you can see who left which song, I transfer it to the Stakeholder Map Excel so I don’t have to go to the Mural to check it) and the day of the workshop I put the Spotify playlist on, open the excel and say things like… «This song is dedicated to Joe» or… «Well well… I’m going to play a BOP, right Sarah?» and their song starts to play and I get a smile out of them.
Another trick I use is: if the result of the project is going to be something that will be used by the participants, for example if it is the digital transformation of the company and the workshop is with its employees, or if it is the design of a tool that will later be used by the employees, I use Behavioral Economics to get the participants after the workshop to be catalysts for it. For example, the Ikea Effect bias tells us «we value more the things we have put effort into». I assign a small task to one of the participants like «Diane, can you please help me move the sticky note?» It’s not really about them doing your job, but about them feeling part of it.
At the beginning you let her move one sticky note (actually, you let her move a few), but in the last exercises you let her move more. This way, at the end of the workshop (Peak-End Rule) you can thank her and acknowledge her for her work: «Thank you very much Diane, great job! you are already a great facilitator». This way we encourage Diane to feel that she is the owner or responsible for the workshop, so she will be an evangelist, a catalyst of the outcome of the workshop because she will feel it as her own and will encourage the rest of her colleagues to embrace the change (in the case of a digital transformation, which reduces resistance to change in the organisation). Or motivates them to use the tool, when designing a new one.

Tattoo it
3. POST
3.1. Feedback
I recommend you always ask for feedback, to improve with every Workshop you do:
Example of questions to launch:
- What did you think of the session?
- What would you improve?
- What would you celebrate?
- What would you keep?
Mentimeter has a word cloud functionality which is great if you want to ask for feedback on the spot. If you prefer something more detailed and you want feedback once the workshop is over, I recommend that you send a Google Forms type questionnaire from which you can extract data more easily.
Generally, a negative and a positive question is asked, in order to analyse the feeling of the workshop, which you then pass on to the client so that they can find out what the participants thought of it.
3.2. Next steps
It is very important to communicate the next steps after the workshop.
Remember that the participants have given you part of their time (probably in addition to their daily life) and they want to know what is going to happen next and what the consequences of what they have done in the workshop are.
This is usually communicated at the end of the workshop, but may be communicated by e-mail.
3.3. Debrief
This document includes the goal of the workshop, the activities that have been carried out (try to include screenshots of the Mural, photos of the video conferences / participants…) and the conclusions drawn from them.
3.4. Acknowledgement
The icing on the cake. We all like to be appreciated, recognised and thanked.
The more «touching the potato» the way you thank them, the more successful it will be and the more engagement you will get from the participant.
It can be right at the end of the workshop, a few days later… in an image, a presentation or even a video with the funniest moments.
This is very important especially in workshops on strategic plans, digital transformation, design of new tools for the company… because the participants will feel «owners» (responsible) of the workshop and will probably be ambassadors or catalysts of change.
Moreover, there is a bias -peak – end rule- according to which we value experiences depending on how we feel at the most intense point and at the end of the experience, so what better thing to do than to say thank you and thus encourage them to leave with a good memory!
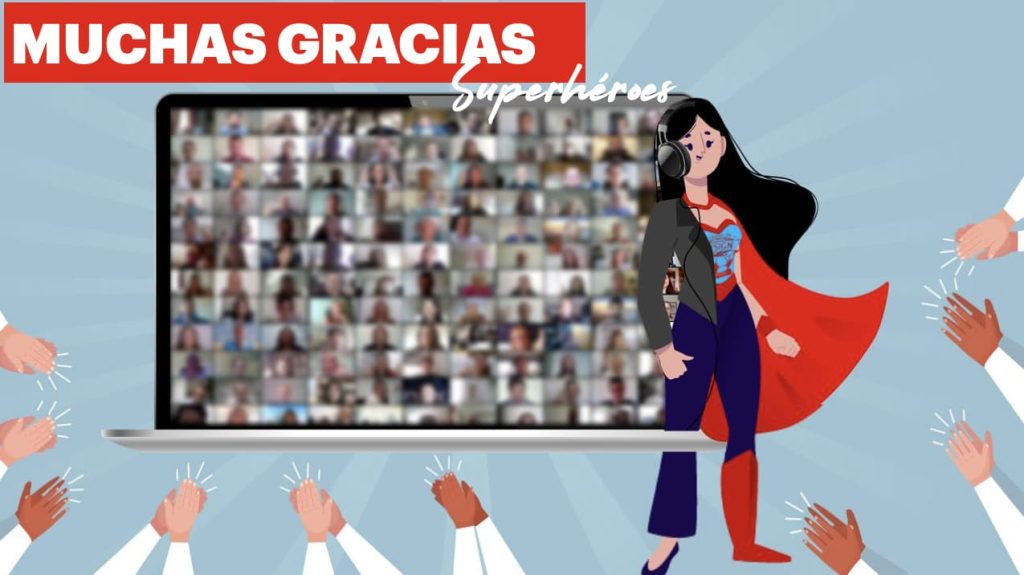
Image projected at the end of the workshop, after communicating the «next steps». On the laptop there is a miniature of all the participants of the workshop. There were 15 4-hour sessions over 3 weeks. Real superheroes.
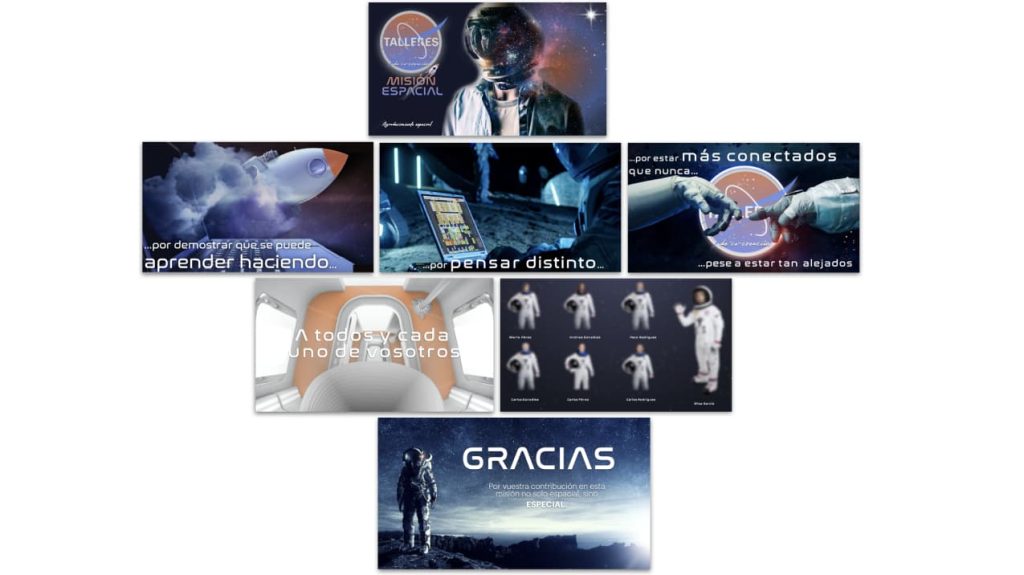
Thank you document sent after the workshop. It was like a yearbook where all the participants (one by one with photoshop) we made like a yearbook and dressed up the participants as astronauts.
Because...
Always remember that we are humans and as such, we feel, we suffer and get excited.
And thank you very much who has read this far.
*Article based on the class I taught (remotely) at Neoland for the UX/UI Bootcamp students on March 30, 2021.